HTTP support in the .NET Framework is wrapped by HttpWebRequest and HttpWebResponse classes which derive from WebRequest and WebResponse, respectively. HttpWebRequest and HttpWebResponse encapsulate a standard HTTP request-and-response transaction and provide access to common HTTP-headers. These classes also support other HTTP features such chunking, pipelining, authentication, encryption, proxy support, server certificate validation, connection management, and others.
Application receive HTTP protocol errors by catching a WebException with WebException.Status set to ProtoclError.
Applications that use HTTP to connect to Internet resources can use ServicePoint and ServicePointManager to manage connections to the Internet and achieve scalability and performance.
ServicePoint class provides an application with an endpoint to which the application can connect to access Internet resources. In Each ServicePoint instance contains information that helps optimize connections with an Internet server by sharing optimization information between connections. A ServicePoint is identified by a URI and is categorized according to the scheme identifier and host fragments. For example, the same ServicePoint would manage connections to both http://www.diranieh.com/X.htm and http://www.diranieh.com/Y.htm because they have the same scheme identifier (http) and same host fragments (www.diranieh.com). If the application already has a connection to the server, ServicePoint will use that connection to serve those two requests, avoiding the need to create another connection.
ServicePointManager is a static class that manages the creation / destruction of ServicePoint classes. ServicePointManager creates a ServicePoint instance when an application requests an Internet resource that is not managed by one of the existing ServicePoint instances already managed by ServicePointManager. Likewise, ServicePointManager destructs a ServicePoint instance when it has exceeded its maximum idle time (ServicePointManager.MaxServicePointIdelTime) or when the number of existing ServicePoint instances has exceeded the maximum number (ServicePointManager.MaxServicePoints) allowed.
An application can associate requests to a specific Internet resource with a defined connection pool. This is the same concept as connection pooling in ADO.NET. WebRequest.ConnectionGroupName is used to name a group of connections to an Internet resource so that multiple requests to that same Internet resource can be made over the same connection. For example:
// Create a WebRequest instnace and
set its connection pool
WebRequest webrequest =
WebRequest.Create( "www.diraneih.com"
);
webreqeust.Credentials = new
NetworkCredential( strUserName, strPassword, strDomain);
webrequest.ConnectionGroupName = strUserName;
// Make a request
WebResponse webresponse = webrequest.GetResponse();
...
To access an Internet resource through a proxy, you must configure a proxy instance to allow WebRequest instances to communicate with the Web proxy:
WebRequest webrequest = WebRequest.Create( "www.xyz.com"
);
webrequest.proxy = new WebProxy( "http://webproxy:80" );
.NET networking capabilities are grouped into several namespaces, with the fundamental networking capabilities defined by classes and interfaces of the System.Net.Sockets namespace. This namespace offers the following::
Stream-based sockets will be the most desirable method of communication for .NET developers. Note that connectionless services like UDP may offer better performance but less reliability than do connection-oriented services like TCP. Note that the TCP protocol and its related set of protocols enable inter-communication among a wide variety of heterogeneous computer systems.
System.Net namespace was discussed previously as the namespace that provided the high-level WebRequest and WebResponse classes, among many other support classes and interfaces. All network-access classes in System.Net namespace are built on top of classes offered by System.Net.Sockets. The System.Net.Sockets namespace provides a managed implementation of the Windows Sockets interface.
System.Net.Sockets namespace provides a managed implementation of the Windows Sockets interface in the form of many classes, some of which are high-level while others are low-level. For example:
TcpClient and TcpListener represent the network using the NetworkStream class. Their usage is illustrated below:
Typically with stream sockets, a server program has a listening sockets that waits for a connection request from a client (out of potentially many clients). Often the server will contain a control structure that executes continually until the server receives a request for a connection from a client. On receiving the request, the server establishes a connection with the client and then uses this newly-established connection (represented by another socket) to handle future requests from the client to send and receive data.
Establishing a TCP server requires five steps:
// Create a listening
socket
TcpListener server = new TcpListener( port );
The above binds (assigns) the server process to the specified port
number. A port number is nothing but a numeric identifier that a process
can use to identify itself at a given network address (also known as the IP
Address). Given that an IP Address uniquely identifies a computer on the
Internet, the IP Address / port number pair can uniquely identify a
networking process across the Internet. Therefore, no two processes can have
the same port number at a given IP Address. Explicitly binding a socket to a
port using Socket.Bind() method is usually not
necessary, because TcpListenter and other socket
classes does this implicitly. Note that part numbers can have any value from 0 to 65535, however,
operating systems often reserve port numbers below 1024. Therefore, a
server-side network application should not use port numbers below 1024.
// Start
listening for incoming requests
server.Start();
TcpListener.Start()
initializes the underlying Socket, binds the
underlying Socket to the server's address, and
begins listening by calling the Listen method of
the underlying Socket. TcpListener.Start()
only listens for connection requests. To detect these requests you can use
the Pending method to detect incoming connection
requests, or the AcceptSocket or AcceptTcpClient
methods to block until a connection request comes in.
Socket connection = server.AcceptSocket();
When the server receives a request via AcceptSocket(), a method called Accept() is called on the socket underlying the TcpListener object. This is an example of how C# networking classes hides some of the details of working with sockets. AcceptSocket() returns a Socket that you can use to send and receive data. Note that this Socket will be initialized with the IP address and port number of the remote machine (the client, in this case.)
One problem with this scheme is that step 4 blocks other requests while processing a client's request, so that not other client can connect with the server while the server is busy processing the other client. The most common technique to handle this situation is to use multithreaded servers which places the processing phase code in a separate worker thread: When the server receives a new connection request, it spawns or creates a new thread leaving the TcpListener free to process other connection requests. For example, a multithreaded server can pre-create a number of threads to establish a pool of threads. These threads can be assigned quickly to handle network I/O across newly created client Sockets. So, when a connection is received, the server does not incur the overhead of thread creation.
Four steps are required to create client-side TCP (or stream) socket.
TcpClient client = new TcpClient();
client.Connect( serverAddress, serverPort );
Another version of this function accepts an object reference of class IPEndPoint
which represents an IP address/port number pair. TcpClient.Connect()
method calls Socket.Connect() to establish the
connection.
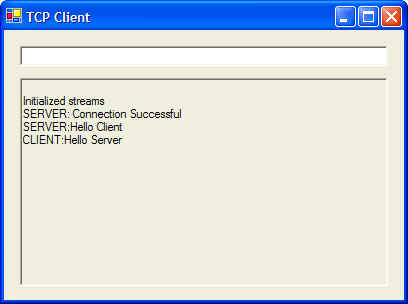
In the Stream Chat Application, the server waits for a client to make a connection request. When a client connects to the server, the server will send back an acknowledgment indicating that the connection was successful. The client then displays a message notifying the user that a connection was established with the server. Both the client and the server application contains text boxes that allow uses to input text and send it to the other side.
When the server or a connected client sends TERMINATE, the connection between the server and the connection terminates and the server waits for another client to make a connection. Project Stream Chat has a client and server that can communicate with each other using the steps outlined above.
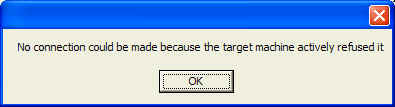
The following illustrate some outputs from the example. If you attempt to launch the client first, you will get the following error dialog box:
Therefore, launch the server first as the client immediately attempts to establish a connection (another approach would be to have a 'Connect' button on the client to establish a connection to the server). After launching the server, the client can be launched. The following illustrates how data is exchanged between client and server:

In a classic example, connection-oriented transmission is always compared to a telephone conversation. You cannot talk until a connection is established. And the connection must be kept alive at all times, whether the participants are talking or not.
By contrast, connection-less transmission via datagrams resembles (again using a classis example) the postal delivery service. Connection-less transmission bundles and sends information in packets called datagrams which can be though of as postal letters. If a large message does not fit in one letter, the message is broken down into smaller pieces and placed is separate, sequentially numbered packets. All letters are mailed at once The letters might arrive in order, out of order, or not at all. The person at the end must reassemble the message pieces into sequential order before attempting to interpret the message. If the message is small enough to fit in one envelope, the sequencing problem is removed, but it is still possible that the message will never arrive.
C# provides the UdpClient class for connection-less transmission. Like TcpListener and TcpClient, UdpClient uses methods from the Socket class. The UdpClient's Send and Receive methods are used to transmit data with the Socket's SendTo and ReceiveFrom methods. Therefore, UdpClient builds on the Socket class to provide UDP services at a higher level of abstraction. Because UDP is connection-less, you do not need to establish a connection to a remote host prior to sending and receiving. However, you have the option of establishing a connection to a default remote host by using UdpClient.Connect() method.
When using UdpClient, you will often have to use an IPEndPoint object. An IPEndPoint represents the remote host from which data was sent. By combining the host's IP address and port number of a service, the IPEndPoint class forms a connection point to a service. Relating to the IPEndPoint class is the IPAddress class. This is just a simple wrapper that contains the IP address of a machine.
To receive data you call UdpClient.Receive() method which polls the underlying socket for incoming datagrams. When data arrives, Receive returns the data portion of the datagram as an array of bytes.
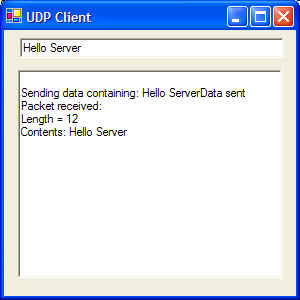
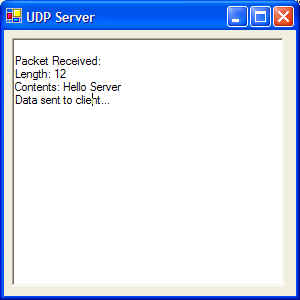
The Datagram Chat Application is the same as the Stream Chat Application, except that datagrams are used instead of streams. Note that it does not matter which side you launch first as no connection is established until data need to be sent. Also note that the server will send whatever it received back to the client (just to show that two-way communication is established):