Both CORBA and DCOM have employed distributed reference counting to manage object's lifetime. With DCOM, the server's objects keep counters of referrers that rely on AddRef() and Release() methods in the same way as it is done for local COM objects. This has the drawback that each call to increase / decrease the reference count has to travel to the remote object. The client also uses pings at 2-minute intervals to let the server know that the client is alive.
Both pinging and the calls to change the reference count will increase the network load. Also, remote calls to change the remote reference count may not work across firewalls or proxies that only allows stateless HTTP connections to pass through.
Current .NET Remoting uses instead a lease-based lifetime service which essentially assigns a time-to-live (TTL) count to each object created at the server. A LeaseManager then polls all server-side objects at certain intervals and decrements this TTL. As soon as an object's TTL reaches zero, it will be marked as timed-out and will be marked for garbage collection. Additionally, for each method call placed on the remote object, the TTL is increased again to ensure that objects in use will not time out.
In certain applications, there are server-side objects that might rarely be called. With a TTL approach, these objects will frequently time-out. Because of this, the .NET Framework also supports a concept called sponsorship. For each object, one or more sponsors might be registered. Upon reaching zero TTL, the LeaseManager contacts the sponsor of the timed-out object and asks if it (the sponsor) wants to increase the object's lifetime. Only when the contacted sponsor does not respond positively in a given time that the timed-out object will be marked for garbage collection. Note that the sponsor itself is a MarshalByRefObject and can therefore be located on the client, the server, or any other machine reachable by .NET Remoting.
A lease holds the time-to-live information for a given object. It is therefore directly associated a certain instance of a MarshalByRefObject. When creating a lease for an object, the following information must be set:
| Property | Default | Description |
| InitialLeaseTime | 5 minutes | The initial TTL after an object's creation. |
| RenewOnCallTime | 2 minutes | The grace time for a method call that is placed on the object. These times are not additive. Calling a method 10 times will not increase the TTL to 20 minutes |
| SponsorShipTimeout | 2 minutes | If a sponsor is registered for a lease, they will be contacted when the TTL expires. They then contact the LeaseManager to request additional time for the sponsored object. When the sponsor does not react during this time, the lease will expire and the object will be marked for garbage collection. |
Both the ILease interface and the Lease class the provide the standard implementation are located in System.Runtime.Remoting.Lifetime. Whenever a MarshalByRefObject is instantiated (SAO or CAO), the framework will call the object's InitializeLifetimeService() method which will return an ILease object. In the default implementation of InitializeLifetimeService() method (i.e., if you don't override), the instantiated object will be assigned a least with the aforementioned defaults.
Note: If you do not know the namespace of any given class in .NET, you can use the .NET Framework SDK tool WinCV.exe.
The LeaseManager runs in the background of each server-side application and checks all remoted objects for their TTL. It uses a timer and a delegate that calls its LeaseTimeAnalyzer() method at certain intervals. The initial value for this interval is 10 seconds. This interval can be easily changed using code or a configuration file entry:
LifetimeServices.LeaseManagerPollTime = TimeSpan.FromSeconds( 20 ); // check leases every 20 seconds
<configuration>
<system.runtime.remoting>
<application>
<lifetime
leaseManagerPollTime="20s" />
</application>
</system.runtime.remoting>
</configuration>
You can easily change the default TTL for all objects in a given server-side application in two ways. again using code and the preferred configuration file:
LifetimeServices.LeaseTime = TimeSpan.FromMinutes( 10
); //
This is the InitialLeaseTime property
LifetimeServices.RenewOnCallTime = TimeSpan.FromMinutes( 20
); //
<configuration>
<system.runtime.remoting>
<application>
<lifetime
leaseTimeOut="10M" renewOnCallTime="20M" />
</application>
</system.runtime.remoting>
</configuration>
Be aware that this will affect each and every remoted object in the server-side application. Increasing the TTL can have negative effects on memory usage and resource utilization in the application, whereas decreasing it can lead to objects being prematurely destroyed. Note that whenever a client places a method call to a remote object with an expired TTL, an exception will be thrown.
For certain kinds of MarshalByRefObjects, such as Singletons or objects published by RemotingServices.Marshal(), it is desirable to have an infinite TTL, or a different lease time from that of other objects on the same server. You can implement this functionality by overriding MarshalByRefObjects's InitializeLifetimeService() method. For example, to provide a Singleton with an infinite TTL:
public class SingletonWithInfiniteTTL : MarshalByRefObject
{
...
public override object InitializeLifetimeServices()
{
return null;
}
}
To set a custom lifetime different from infinity, call base.InitializeLifetimeService() to acquire the reference to the standard ILease object and set the corresponding values:
public class SingletonWithInfiniteTTL : MarshalByRefObject
{
...
public override object InitializeLifetimeServices()
{
// Get a reference to the standard ILease and check that it has not been initialized yet
ILease CurrentLease = (ILease)base.InitializeLifetimeService();
if (CurrentLease.CurrentState ==
LeaseState.Initial)
{
CurrentLease.InitialLeaseTime =
TimeSpan.FromSeconds( 5 );
CurrentLease.RenewOnCallTime =
TimeSpan.FromSeconds( 1 );
}
}
}
The following example shows how to implement different changes in an object's lifetime in one application. The server exports three Singleton objects:
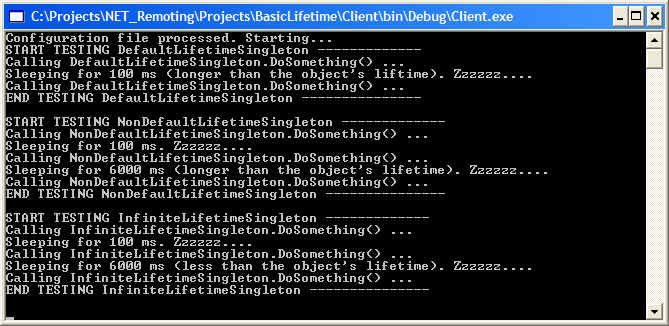
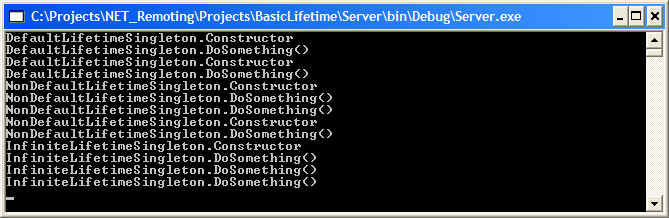
Note the the <lifetime> is used to set the default lifetime of all CAOs and SAO Singletons. To set the lifetime of individual objects, you'll have to override MarshalByRefObject.InitializeLifetimeService() method. The following screens shots from Basic Lifetime Management illustrate the behavior of these objects:
The .NET Remoting Framework only allows the default lifetime to be changed for all objects, which might force you to hard code changes for class-specific TTLs. The problem here is that you might not know about the possible deployment scenario for each server-side object that you develop, so non-default lifetimes should be customizable by configuration files only. The basic approach is not to let your remote objects derive directly form MarshalByRefObject, but instead derive from an enhanced subtype that will check the application's configuration file to read and set changed lifetimes.
For example, MarshalByRefObjectEx would derive from MarshalByRefObject and overrides InitializeLifetimeService to read the configuration file for non-default lifetimes on a class-by-class basic. Server-side classes would then derive from MarshalByRefObjectEx instead of deriving from MarshalByRefObject class. The <appSettings> configuration file could be used to provide lifetime values on a class-by-class basis.
Whenever a remote object is created, a sponsor can be registered with it. The sponsor is contacted by the LeaseManager as soon as the object's TTL is about to expire. The sponsor has then an option to return a TimeSpan which will be the new TTL for the remote object. When a sponsor does not want to extend an object's lifetime it can simply return TimeSpan.Zero.
The sponsor object is a MarshalByRefObject that has to implement the ISponsor interface. The only other requisite for a sponsor is to be reachable by the .NET Framework. The sponsor can therefore, be located on the remote server, on the client, or on some other application server. Be wary of using client-side sponsors as firewalls may present problems.
Sponsors have to implement the ISponsor interface which is defined in System.Runtime.Remoting.Lifetime. It contains just one method called Renewal which will be called by the LeaseManager upon expiration of a lease's time to live. The sponsor has to return a TimeSpan that specifies the new TTL for the object. If the sponsor decides not to increase the lease time, then it can return TimeSpan.Zero. A sponsor can look like:
public class MySponsor : MarshalByRefObject, ISponsor
{
// Helper
private bool IsRenewable()
{
// Check conditions to determine if object should live longer
}
// Interface Implementation
public TimeSpan Renewal( System.Runtime.Remoting.Lifetime.ILease lease)
{
if (IsRenewable)
{
return
TimeSpan.FromMinutes( 5 );
}
else
{
return
TimeSpan.Zero;
}
}
}
When using client-side sponsors you are basically mimicking DCOM's behavior of pinging, although you have more control over the process here. Client-side sponsors should mostly be used with CAOs as SAOs lifetime should be normally managed by the server. So after acquiring a reference to a CAO, you contact its lifetime service and register a sponsor with it. You can get an object's LifeTime Service, which is an ILease object, using the following code:
ILease lease = (ILease)obj.GetLifetimeService();
The ILease interface exposes a Register() method to add another sponsor for the underlying object.
In many scenarios, you will not know which TTL value will be sufficient. For example, assume an application acquires a reference to a CAO and will only call methods on it after waiting for user input. In this case, it might be desirable to add a client-side sponsor to the application and register it with the CAO's lease.
As a first step to enable the application to work with client-side sponsors, you have to include a port="" attribute in the <channel> section of the configuration file. Without this attribute, the channel will accept callbacks from the server. And because you might not know which port will be available at the client, you can supply a value of 0, which allows .NET Remoting to choose a free port on its own. When the sponsor is created on the client and passed to the server, the channel information that get passed to the remote process will contain the correct port number. This is illustrated in Client-Side Sponsor project.
When you decide to use client-side sponsors, you have to ensure that the client is reachable by the server. Whenever you are dealing with clients that may be located behind firewalls, you will have to use a different approach from client-side sponsors. The solution is to use server-side sponsors. These are sponsors that are running in the same process as the target CAOs.
You have to keep in mind several things to make your application run stably:
These issues are illustrated in project Server-Side Sponsor.
As a basic rule of distributed application development, you have to ensure that your deployed clients will keep working even when the server is available in new versions and offering more functionality. Note that this rule may be relaxed if you have control over your clients such as in a corporate environment, or when the distributed application is still in its initial stages with a reasonably small number of clients.
In general, .NET Remoting supports the base .NET versioning services, which also implies you have to use strong names for versioning of CAOs and serializable objects. However, the details of lifecycle management differs quite substantially between .NET Remoting and common .NET functionality, and between various types of remotable objects.
Because SAOs are instantiated on demand by the server, there is no direct way of managing their lifecycle. The client cannot specify to which version of an SAO a call should be placed. The only way to support versioning of SOA is to provide different URLs for them. This means you have to tell your users about the new URL in different ways, as no direct versioning in the .NET Framework is supported.
Depending on the general architecture, you may choose to place SAOs in a different assembly, or have them in two strong-named assemblies that differ only in the version number. In the remoting configuration file, you can specify which version of an SAO is published using which URL.
The .NET Framework can resolve an assembly in two ways:
A strong name can be considered similar to GUID. A strong name consists of the assembly's name, version, culture information, and importantly a fingerprint from the publisher's public/private key pair. A strong name is therefore, a naming scheme used to uniquely identify an assembly without any doubt, because even though another person may choose the same assembly name, version, and culture information, only the owner of the correct key pair can sign the assembly and provide the correct fingerprint. On the other hand, a weak name is the name of the assembly itself.
The general procedure is to generate a key pair file with sn.exe utility and then use the key to sign the assembly. A key pair file can be generated with:
sn.exe -k MyKeyPairFile.key
The generated key must be kept secret as it is your own digital signature. If an unauthorized person gets access to your signature, they can sign assemblies in your name.
The next step is to sign the assembly with this key pair file. To do this, you have to add some attributes to the project's source file (VS.NET automatically includes those attributes in a file called AssemblyInfo.cs, which by default is added to each project). The following lists the default contents of an AssemblyInfo.cs file:
using System.Reflection;
using System.Runtime.CompilerServices;
// General Information about an assembly
[assembly: AssemblyTitle("")]
[assembly: AssemblyDescription("")]
[assembly: AssemblyConfiguration("")]
[assembly: AssemblyCompany("")]
[assembly: AssemblyProduct("")]
[assembly: AssemblyCopyright("")]
[assembly: AssemblyTrademark("")]
[assembly: AssemblyCulture("")]
// Version information for an assembly consists of the following four values:
[assembly: AssemblyVersion("1.0.*")]
[assembly: AssemblyDelaySign(false)]
[assembly: AssemblyKeyFile("")]
[assembly: AssemblyKeyName("")]
Note the following points:
Therefore, to sign the assembly you have to populate some the assembly attributes as follows:
using System.Reflection;
using System.Runtime.CompilerServices;
...
// Version information for an assembly consists of the following four values:
[assembly: AssemblyVersion("1.0.0.1")]
// Must be changed from the 1.0.* default value
[assembly: AssemblyDelaySign(false)]
[assembly: AssemblyKeyName("MyKeyPairFile.key")]
// MyKeyPairFile.key is generated by sn.exe
The assembly will be actually signed when you compile it. Note that either Explorer of the GacUtil.exe can be used to install an assembly with a strong name in the Global Assembly Cache (GAC).
Lifecycle management for an SAO becomes an issue as soon as you upgrade the SAO's functionality and want currently available clients that use the older version to continue working. The Version SAO project illustrates how to use a versioned SAO. The solution contains General.dll which implements the SAO, Server.exe which acts as a host, and Client.exe which calls old and new versions of the SAO
Here the result of the first run for the client and the server, respectively:


In the next iteration, you may enhance the server with new functionality that might break existing clients. To allow old client to work correctly with the new server, you must let the clients choose which version of the remote object they want to access. So, for the enhanced version of the remote object:
Start Server.exe then run OldClient.exe and client.exe. You should see the following where the old client connect to version 1.0.0.1 and the new client connects to version 1.0.0.2:


The versioning of CAO compared to SAOs is completely different. But a general look at how a CAO is instantiated. When a CAO is instantiated by a client using either new or Activator.GetInstance(), a ConstructionCallMessage is sent to the server. In this message, the client passes the name of the CAO it wishes to create on the server. It also includes the strong name (if available) of the assembly where the CAO is located. This version information is stored in the [SoapType()] attribute of the SoapSuds-generated assembly. SoapSuds does this automatically whenever the assembly passed to it (the -ia parameter) is strong-named.
If you create any simple CAO and use SoapSuds to generate not a DLL but a source file, you will note the existence of XmlNamespace and XmlTypeNamespace attributes which are URLEncoded variants of the version information. The important thing to note is that the version information is hard-coded in these attributes. So whenever, a client attempts to create an instance of a CAO, the server will attempt to instantiate the exact version of the requested type.
If the requested version is not available, it will take the highest version of the specified assembly. For example, if the GAC contains version 1.0.0.1 and 2.0.0.1 and the client requests version 1.0.0.2, the server will choose 2.0.0.1, even though the chosen version differs from the requested version in the major version number. Note that this behavior is differs from the standard .NET versioning approach in which the highest version with the same major and minor version is chosen.
To mimic the standard approach for resolving assembly versions, or to redirect to a completely different version, you can use the assemblyBinding entry in the application's configuration file
<configuration>
<system.runtime.remoting>
<!-- ... -->
</system.runtime.remoting>
<runtime>
<assemblyBinding xmlns="...">
<dependentAssembly>
<assemblyIdentity name="MyServer" publicKeyToekn="..." culture="neutral" />
<bindingRedirect oldVersion="1.0.0.1" newVersion="1.0.1.1" />
</dependentAssembly>
</assemblyBinding>
</runtime>
</configuration>
In this case, the server will take any requests for 1.0.0.1 and use version 1.0.1.1 instead. Remember that this only works when the assembly is registered in the GAC and that you have to use SoapSuds -ia:<assembly> -nowp -oa:<meta.dll> for each server-side version as the [SoapType()] attribute defines this behavior.
Because a [Serializable] object is marshaled by value and its data is passed as a copy, versioning behavior is once more different from SAOs and CAOs. If you use SoapSuds to generate source code for a serializable object, you will note that the namespace information includes the assembly's strong name. If a client attempts to access a serializable object but with a different version, a SerializationException will be thrown.
To enable one-way relaxed versioning schema, you can use the includeVersion attribute in the formatter's configuration entry as follows on order to return a serializable object that does not contain the assembly's strong name:
<configuration>
<system.runtime.remoting>
<application>
<channels>
<channel ref="http" port="1234">
<serverProviders>
<formatter ref="soap" includeVersions="false"/>
</serverProviders>
</channel>
</channels>
<service>
...
</service>
</application>
</system.runtime.remoting>
</configuration>
For the following discussion, recall the following points:
So what happens if a new property was added to the serializable object:
// Vesion 2 of the Customer class
[Serializable]
public class Customer
{
public String strFirstName;
public String strLastName;
public String strTitle;
// New property
...
}
If the implementation of this new Customer object (version 2) is available on the client, while the old Customer (without the new strTitle property) is available on the server, then the client will still be able to serialize the old Customer object because it ignores the fact that the server did not send a value for the strTitle property.
But it will not work the other way. If the server has version 2 of the Customer object and the client has version 1 (without strTitle property) of the Customer object, and the client attempts to retrieve this object from the server, a SerializationException will be thrown when the client attempts to interpret the server's response. This is exactly what we wanted to avoid. To work around this limitation, [Serializable] objects must implement ISerializable interface. Therefore, version 1 of Customer object should be implemented as follows
[Serializable]
public class Customer : ISerializable
{
public String strFirstName;
public String strLastName;
public DateTime dtDOB;
// Note the special constructor
public Customer( SerializationInfo info, StreamingContext context)
{
strFirstName = info.GetString("strFirstName");
strLastName = info.GetString("strLastName");
dtDOB = info.GetDateTime("dtDOB");
}
// ISerializable implementation
public void GetObjectData( SerializationInfo info, StreamingContext context)
{
info.AddValue("strFirstName", strFirstName);
info.AddValue("strLastName", strLastName);
info.AddValue("dtDOB", dtDOB);
}
}
When you want to upgrade the Customer object to version 2 by adding strTitle, you will have to adopt GetObjectData and the special constructor. In the constructor, you have to enclose the access to the newly added property with a try-catch block to enable you to react to a missing value. This might occur when the remote application is still working with version 1. The following shows version 2 of the Customer object with the new strTitle property:
[Serializable]
public class Customer : ISerializable
{
public String strFirstName;
public String strLastName;
public DateTime dtDOB;
public String strTitle;
// Note the special constructor
public Customer( SerializationInfo info, StreamingContext context)
{
strFirstName = info.GetString("strFirstName");
strLastName = info.GetString("strLastName");
dtDOB = info.GetDateTime("dtDOB");
try
{
strTitle = info.GetString("strTitle");
}
catch( Exception e)
{
strTitle = "N/A";
}
}
// ISerializable implementation
public void GetObjectData( SerializationInfo info, StreamingContext context)
{
info.AddValue("strFirstName", strFirstName);
info.AddValue("strLastName", strLastName);
info.AddValue("dtDOB", dtDOB);
info.AddValue("strTitle", strTitle);
}
}
Key point: Asynchronous programming in a .NET Remoting scenario is identical to asynchronous programming in a single application domain or context (of course, except for configuration and the requirements of the .NET Remoting Framework.)
To use asynchronous remote calls in an application that calls across application domains, context, or machine boundaries, .NET remoting must be configured to ensure that the client qualifies as a target for a remote call from the server. This is because asynchronous remote calls are expected to call back the original caller (i.e., client) from the server where the method is being executed. For example, if you use a delegate to a static method (which cannot be remoted), or forget to set a port for the client channel to "0" (to enable the system to automatically select a client port), your call to the server might complete, but you will not be able to obtain the result because the call back to the client is not complete.
The client need not derive from MarshalByRefObject or configure any remote type, but nonetheless, it (the client) must follow the same rules for using any remote type on a remote server:
In the .NET Framework, there are two ways of executing methods and processing their results asynchronously:
Before discussing how to program remote asynchronous calls, it is worth reviewing delegates very quickly: If Ob1 creates Ob2, then Ob1 can easily talk to Ob2 by calling methods on Ob2. However, if you want Ob2 to talk back to Ob1 (i.e., you want Ob2 to call methods on Ob1), then you'll have to use delegates. Technically, a delegate is nothing but an object oriented wrapper around a function pointer. Continuing with Ob1 and Ob2, to let Ob2 call some method on Ob1, say foo(), then you would create a delegate for foo() and pass this delegate to Ob2. Ob2 can then invoke this delegate, and this in turn will foo() on Ob1.
Note that delegates are signature-specific with respect to the functions they are supposed to invoke. For example:
public delegate int MyDelegate1( string
); // This delegate is able to call
functions that take a string and return an int.
public delegate double
MyDelegate2() //
This delegate is able to call functions that take no parameters and return a
double.
To use a delegate, you need to keep in mind that a delegate is really a class derived from System.MutliCastDelegate. Hence you create a delegate just as you would create an object. Additionally, the delegate takes as its constructor parameter the function to be called. Assuming that Ob1 has a method called bar(string) that returned an int, you would create a delegate as follows:
MyDelegate1 dlgtBar = new MyDelegate1( Ob1.bar );
dlgtBar delegate can then be passed to Ob2 so that Ob2 can call back function bar() on Ob1 when appropriate.
Events are based on delegates. Events lessen the burden of using delegates when one object wants to talk to another object. Again you have the concept of Ob1 and Ob2, but in this case, Ob1 is interested in being called by Ob2 under certain conditions. From an events perspective, Ob2 fires events and Ob1 listens (sinks) these events. To use events, in Ob2 you declare the event name and associate it with a delegate, so that when the event is raised, the method (or methods) associated with the delegate is (are) called. In our scenario, this method is on Ob1.
/* This class represents Ob2. It
uses its delegate to fire an event (i.e., calls the delegate's method) */
public class Account
{
// Declare the delegate
public delegate void CreditLimitHandler( string msg );
// Declare events that Account can send
public static event CreditLimitHandler OverDraft;
// Public interface
public void Withdraw()
{
...
// If withdraw
amount exceeds available funds, then fire the OverDraft event. This will the
call function(s) maintained
// by the CreditLimitHandler delegate
If ( dWithdrawAmount > dAvailableMoney)
OverDraft( "Sorry. You have exceeded your limit" );
...
}
}
/* This class represents Ob1. It sinks events fired by Ob2
(i.e., it is interested in being called back by Ob2 under certain conditions
determined by Ob2) */
public class Customer
{
...
public bool PayBill()
{
// Customer talks to Account
(but also wants to be informed by Account if something happens)
Account acnt = new Account();
// Hook into events fired by Account. InsufficientFunds is the function that Account
// will call if it fires the OverDraft event
Account.OverDraft += new Account.OverDraft( InsufficientFunds );
// Now attempt to withdraw
acnt.Withdraw(); // might generate an event
...
}
// Note how the signature of this function matches that of CreditLimitHandler delegate
void InsufficientFunds( string msg )
{
...
}
}
The same delegate concepts above can be applied to achieve asynchronous remote calls. In general, the pattern for asynchronous remote calls is:
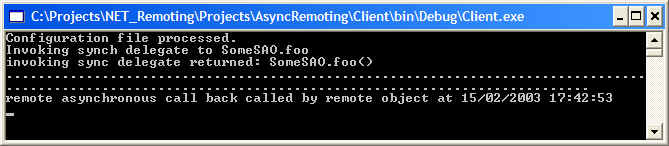
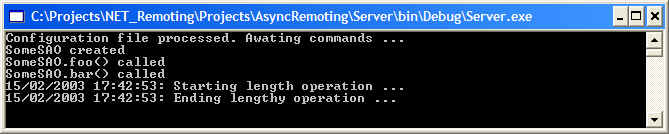
The Asynchronous Remoting project illustrates asynchronous programming in a remote scenario. The example first creates a synchronous delegate to a remote object and invokes it to illustrate the thread waiting on the return. Then the example uses asynchronous delegates to invoke a remote object and wait for the response. The following screens illustrate output from both client and server:
Using a delegate's BeginInvoke() and EndInvoke() just simulates an asynchronous call as the underlying connection will be synchronous when using one of the default HTTP or binary channels. This means that a separate HTTP connection will be created for each concurrently running asynchronous call.
If you attempt to used delegates with objects in SoapSuds-generated assemblies, you will end up with TypeLoadExceptions due to the way types are resolved in the remoting framework. This is because the .NET Framework tries to load the Type according to the SoapType attribute's XmlTypeNamespace property. To work around this in SAO, you can remove the SoapType completely by using SoapSuds to generate code and manually remove this attribute and recompiling. However, this does not work with CAOs. For CAOs you will need to use a wrapper method in the client application that forwards the call to your remote object. This wrapper method is called asynchronously from the client applications and renders the remoting call synchronously in regard to the wrapper method.
Note: The RemotingEvents sample that comes with the .NET Framework SDK (Microsoft Visual Studio .NET\FrameworkSDK\Samples\Technologies\Remoting\Basic\RemotingEvents) deals with events on server-side objects. Specifically, Waz and Baz are two server-side objects with Waz firing events and Baz handling events. In other words, events are not remoted from server to client. This section discusses remoting events from server to client.
Assume you want to implement a broadcasting solution where a number of clients register themselves as listeners with a broadcasting server and other clients can send messages to the server, which in turn will broadcast these messages to all listening clients.
You need to take into account two facts when designing such an applications. First, when an event occurs, client and server will change roles. This means that the client really becomes the server (for the callback method) and the server will become a client trying to contact the real client. The other issue relates to the fact that when the server attempts to validate the call back method's signature, it will need to load the assembly containing the destination method, which is the client-side assembly, which is not available at the server. The easy solution is to ship the delegate's assembly to the caller, which would mean that the client-side application has to be referenced at the server. This is the easy solution, but from a distributed application development point-of-view, it is highly un-recommended.
Instead, you can introduce an intermediate MarshalByRefObject (wrapper) including the implementation that will be located in the shared assembly and will therefore be accessible by both clients and server:
public class EventWrapper : MarshalByRefObject
{
public event MessageArrivedHandler MessageArrivedLocally;
[OneWay] //
See below
public void MessageArrived( string str )
{
// Forward message to client
MessageArrivedLocally( msg );
}
public override object InitializeLifetimeService()
{
// This object must live forever
return null;
}
}
This wrapper is created in the client. The server in turn receives a delegate to MessageArrived method which calls the MessageArrivedLocally event, and this event will be handled by the client. This approach ensures that both client and server have access to General.dll in a way such that events and delegates can be resolved at either side
Project Remote Events illustrates how to fire events to remote clients, except that it uses an intermediate wrapper. When the server want to fire an event to any listening client, it fires an event to the EventWrapper class which then fires the event to all listening clients. The following are outputs when running this application:


Remote event handles are sometimes declared [OneWay] because without this attribute, an exception will be thrown whenever a client is unreachable or has been disconnected without first un-registering the event handler.
With [OneWay] the server will try to contact each listener but will not throw an exception if the listener is not available. Initially, this might seem as a good thing to do. However, imagine that your application will run for months without restarting. As a result, many unreachable event handlers will end up registered and the server will try to reach each one of them each time it wants to send an event. Not only will this take network bandwidth, but it will also affect scalability. This is something that is completely undesirable in a broadcasting application.
Instead of using the default event invocation mechanism which is fine for local applications, you will have to develop a server-side wrapper that calls event handlers in a try-catch block and removes all non-working event handlers in the catch block (because an exception would be thrown if the event handler is not reachable). In the previous example, this implies that the [OneWay] is removed from the event handlers, and the MessageArrived event is removed and instead we call a function which iterates over the list of registered delegates (using GetInvocationList) and calls each one in a try-catch block. The catch block will catch all exceptions thrown by the framework when the destination is unreachable and remove the unreachable delegate.