Application-Level Programming - Windows
Summary
A WPF application typically has at least one window and sometimes several windows open. The section shows how to manage these windows.
Window objects
A window in a WPF application can be represented by:
Window object
The Window object supports core window functionality. An application typically uses this object if it does not use navigation because as Window object has less overhead than the NavigtationWindow object. The Window object supports a set of properties, methods, and events to control the appearance of a window and provide a response to user interaction.
The Window object is used primarily to display windows and dialog boxes for standalone applications. For applications that require navigation at the window level, such as wizards, you can use the NavigationWindow instead (see next section).
Note that Window is a ContentControl: this means that Window can contain content such as text, images, buttons, panels, etc. Also, Window is a root element and hence cannot be part of another element’s content.
NavigationWindow Object
The NavigationWindow object is an extension of the Window object and supports ability to navigate and display content. Content can be any type of .NET Framework 3.0 object and HTML files (however, a Page is the preferred way to package content for navigation – see next section)
- Content can be navigated to either by setting the Source property with a URI or by using one of the overloads of the Navigate method.
- A default navigation UI that supports forward and backward navigation.
- A journal that records navigation history.
- Navigation events to track navigation progress.
Note that NavigationWindow is a ContentControl: this means that NavigationWindow can contain content such as text, images, buttons, panels, etc. Also, NavigationWindow is a root element and hence cannot be part of another element’s content.
Page object
Page encapsulates a page of content that can be navigated to and hosted from NavigationWindow, Window, Frame, UserControl or from a browser. The Page object, which inherits from FrameworkElement, is typically used only in markup because you can access the NavigationWindow object directly with procedural code. Page provides a limited set of window properties, including:
- Event raised by the FrameworkElement.
- Properties to specify window size.
- Properties to specify window appearance.
Window Lifetime
Opening a Window
When a WPF application starts, the first window created by the Application object becomes the main window. You can get a reference to this window using Application.Current.MainWindow property. Because Application.Current.MainWindow property is read/write, you can change your main window by assigning another window to MainWindow.
Opening a window is very easy: Instantiate the window-derived object then show it:
MyWindowObject win = new
MyWindowObjecT();
win.Show();
Similary, when a window is instantiated, a reference to it is automatically added to the list of windows managed by the Application object. This list of windows is accessible through Application.Windows property.
Window Ownership
When a window is opened with Show, it has no knowledge of, or relationship with, the window that created it. Users can interact with each window independently. For a window to a have a tighter relationship with the window that created it, you need to set the Owner property to indicate the owner or parent of the window:
MyWindowObject win = new
MyWindowObjecT();
win.Owner = this;
win.Show();
Note that the owner window can discover all its owned window by enumerating the OwnedWindows property.
Window Events
The Window object supports several events that notify you of changes in the state of the window, while NavigationWindow supports an additional set of evens to enable you to monitor the progress of navigation. The following figure illustrates the key events in the lifetime of a window:

Creating
Windows
There are a couple of ways to create a window and display its content. The following sections illustrate:
Create a Window and display an XAML page
Here, just set the Application object to the initial XAML page using the StartupUri property. The Application object automatically creates a window and displays the specified page as follows:
- If the root element of the specified page is Window or NavigationWindow, the Application object creates the window and shows it.
- For all other root element, the Application objects creates a NavigationWindow and navigates it to the specified page.
In the following example, the Application objects creates a NavigationWindow and navigates it to page Page1.xaml:
<!-- MyApp.xaml -->
<Application xmlns=""
xmlns:x="" x:Class="SimpleNav.App"
StartupUri="Page1.xaml" />
<!-- Page1.xaml -->
<Page xmlns="" xmlns:x=""
x:Class="SimpleNav.Page1" Loaded="Init"/>
Create a Window and Display Content Using XAML and Code
This is the best of both worlds – utilize XAML expressiveness to define appearance while using code to implement the behaviours. The following shows a very minimal example
<!--App.xaml -->
<Application xmlns="http://schemas.microsoft.com/winfx/2006/xaml/presentation"
xmlns:x="http://schemas.microsoft.com/winfx/2006/xaml"
x:Class="App"
StartupUri="MyMainWindow.xaml" />
<Application.Resources>
</Application.Resources>
</Application>
//App.xaml.cs
public partial class App : System.Windows.Application
{
// Empty implementation
}
<
span style='color:green'><!--MyMainWindow.xaml -->
<Window x:Class="WPFApplication.MyMainWindow"
xmlns="http://schemas.microsoft.com/winfx/2006/xaml/presentation"
xmlns:x="http://schemas.microsoft.com/winfx/2006/xaml"
Title="WPFApplication"
Height="300" Width="300">
<Grid>
<!--
GUI elements come here -->
</Grid>
</Window>
//MyMainWindow.xaml.cs
public partial class MyMainWindow : System.Windows.Window
{
public MyMainWindow()
{
InitializeComponent();
}
}
Note that for a window that is defined using both markup and code, the Build Action for the markup code needs to be set to Page, while the code-behind file needs to be set to Compile.
When built, the markup is turned into a special type of resource that can be identified uniquely by a URI. Essentially, this enables WPF to load a Window declaratively from a URI, and you can use this capability to specify a window to be automatically opened when an application starts. You do this by setting the Application.StartupUri attribute in markup::
<!--App.xaml (markup)-->
<Application ... StartupUri=" MyMainWindow.xaml " />
Example 1
The following example shows how to implement a basic Windows application with WPF:
<!-- App.xaml -->
<Application
xmlns=http://schemas.microsoft.com/winfx/2006/xaml/presentation
xmlns:x=http://schemas.microsoft.com/winfx/2006/xaml
StartupUri="MainWindow.xaml">
</Application>
<!-- MainWindow.xaml -->
<!-- A
Window element is used to define the main window that will be used to host WPF
pages and other content. The Window below shows how to implement a Window using
XAML and code.
The XAML implementation is shown below. For the code, there will be two code
files, one named <filename>.g.cs and this is auto-generated, and another
file named <filename>.cs, and this is implemented by the developer. Both
of these code files implement a partial class whose name is identified by the x:Class
attribute of the <Window> element.
The auto-generated
partial class IMPLEMETS InitializeComponent method which is called to
register the events and set the properties that are implemented in markup. The
other hand-written class must also be a partial class with the same name
specified by the x:Class attribute, and needs to derive from the root
element of the associated XAML file (in this case, the root element is Window).
This class must implement a constructor that calls the InitializeComponent
method, otherwise the markup will not be applied.
Finally,
note that this window is identified as the main window by setting the StartupUri
property of the Application element to the name of the XAML file that
contains this window element.
-->
<Window x:Class="Navigation.MainWindow"
xmlns=http://schemas.microsoft.com/winfx/2006/xaml/presentation
xmlns:x=http://schemas.microsoft.com/winfx/2006/xaml
Title="NavigationService Sample"
Height="300"
Width="500"
MinWidth="200"
MinHeight="200">
<!-- The one and only child element -->
<StackPanel>
<Button Name="TestButton"
Click="TestButton_Click"
VerticalAlignment="Top
HorizontalAlignment="Center" Width="50">Go</Button>
</StackPanel>
</Window>
// MainWindow.cs
public partial class MainWindow : Window
{
public MainWindow()
{
InitializeComponent();
}
void TestButton_Click(object sender, RoutedEventArgs e)
{
// Create a window and make this window its parent. Do not set the Owner property if you
// want the 'child' window to be independent of the main window.
ChildWindow win = new
ChildWindow();
win.Owner = this;
win.WindowStartupLocation = WindowStartupLocation.CenterOwner;
win.WindowStyle = WindowStyle.SingleBorderWindow;
win.ShowInTaskbar = true;
win.Show()
// Note that the owner window can discover all its owned windows by enumerating over the
// 'OwnedWindows' collection. You can then determine which window is active using IsActive,
// and activate any window using Activate. For example, code below determine if first window
// is active and if not, activates it:
// if (!this.OwnedWindows[0].IsActive) this.OwnedWindows[0].Activate();
}
}
// ChildWindow.cs
namespace Navigation
{
public partial class ChildWindow : System.Windows.Window
{
public ChildWindow()
{
InitializeComponent();
lstWindowEvents.Items.Add("Note order of events as window is created:");
// Capture relevant events to show what events get fired when a window is loaded
// Loaded and ContentRendered are only fired after Activated has been fired. Therefore,
// a window is considered to have been opened onlyafter ContentRendered has been fired
// Order of event firing is: 1) Activated, 2) Loaded, 3) ContentRendered
this.Loaded += new RoutedEventHandler(ChildWindow_Loaded);
this.ContentRendered += new EventHandler(ChildWindow_ContentRendered);
this.Activated += new EventHandler(ChildWindow_Activated);
this.Deactivated += new EventHandler(ChildWindow_Deactivated);
// When a window is closed, it raises two events: Closing and Close:
this.Closing += new System.ComponentModel.CancelEventHandler(ChildWindow_Closing);
this.Closed += new EventHandler(ChildWindow_Closed);
}
void ChildWindow_Closed(object sender, EventArgs e)
{
lstWindowEvents.Items.Add("Window closed");
}
void ChildWindow_Closing(object sender, System.ComponentModel.CancelEventArgs e)
{
lstWindowEvents.Items.Add("Window closing");
// Confirm if window is to be closed (note fired events in response to your choice)
if (MessageBox.Show("Continue closing?", "", MessageBoxButton.YesNo) == MessageBoxResult.No)
e.Cancel = true;
}
void ChildWindow_Deactivated(object sender, EventArgs e)
{
lstWindowEvents.Items.Add("Deactivated");
}
void ChildWindow_Activated(object sender, EventArgs e)
{
lstWindowEvents.Items.Add("ChildWindow_Activated");
}
void ChildWindow_ContentRendered(object sender, EventArgs e)
{
lstWindowEvents.Items.Add("ChildWindow_ContentRendered");
}
void ChildWindow_Loaded(object sender, RoutedEventArgs e)
{
lstWindowEvents.Items.Add("ChildWindow_Loaded");
}
void CloseButton_Handler(object sender, RoutedEventArgs e)
{
// Shows how to close a window
Close();
}
}
}
Output screens are shown below:

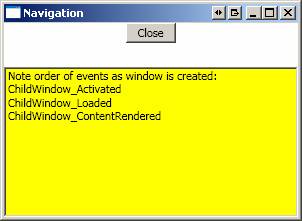
Clicking Close
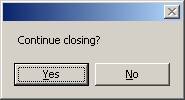
Clicking No:

Example 2
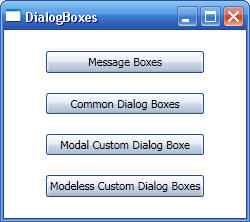
This example illustrates mainly how to use dialog boxes:
<!-- Main window used to test
DialogBox functionalities -->
<Window x:Class="DialogBoxes.Window1"
xmlns="http://schemas.microsoft.com/winfx/2006/xaml/presentation"
xmlns:x="http://schemas.microsoft.com/winfx/2006/xaml"
Title="DialogBoxes" Height="300"
Width="300">
<StackPanel HorizontalAlignment="Center"
Orientation="Vertical" VerticalAlignment="Center">
<Button Margin="10,10,10,10" Click="Button_MsgBox">Message
Boxes</Button>
<Button Margin="10,10,10,10" Click="Button_CmnDlgBox"
ToolTip="">Common Dialog Boxes</Button>
<Button Margin="10,10,10,10" Click="Button_CstmDlgBoxModal"
ToolTip="Modal Dialog box">Modal Custom Dialog Boxe</Button>
<Button Margin="10,10,10,10" Click="Button_CstmDlgBoxModeless"
ToolTip="Modless Dialog box">Modeless Custom Dialog Boxes</Button>
</StackPanel>
</Window>
public partial class Window1 : System.Windows.Window
{
public Window1()
{
InitializeComponent();
}
// Shows how to display a MessageBox
private void Button_MsgBox(object sender,
RoutedEventArgs args)
{
MessageBoxResult result =
MessageBox.Show("Do you want to format your HD",
"Test Msg Box",
MessageBoxButton.YesNo,
MessageBoxImage.Information);
if (result == MessageBoxResult.Yes)
MessageBox.Show("Formatting your HD...");
}
// Shows how to display a common dialog
box such as the 'Open File' dialog box
private void Button_CmnDlgBox(object sender,
RoutedEventArgs args)
{
OpenFileDialog ofd = new
OpenFileDialog();
ofd.DefaultExt = ".xaml";
ofd.Filter = "Extended Markup Files
(*.xaml)|*.xaml";
Nullable<bool> bResult =
ofd.ShowDialog();
if (bResult == true)
Trace.WriteLine("Opening file " + ofd.FileName);
}
// Shows how to display and retrieve
results from a custom MODAL dialog box
private void Button_CstmDlgBoxModal(object sender,
RoutedEventArgs args)
{
// Instantiate
a new window and show it
CustomModalDialogBox dlg = new
CustomModalDialogBox();
dlg.InitializeComponent();
dlg.Owner = this;
// Call this
method to show the dialog box in a modal form (user can only
// work this dialog box). Note that
once ShowDialog() has returned, the dialog
// box cannot be opened, Instead, you
need to create a new instance
dlg.ShowDialog();
// Process data
entered by user if dialog box was accepted
if (dlg.DialogResult == true)
{
// Get dialog box data and process them ...
}
}
// Shows how to display and retrieve
results from a custom MODELESS dialog box
private void Button_CstmDlgBoxModeless(object sender,
RoutedEventArgs args)
{
// Instantiate
a new window and show it (similar to Modal dialog boxes)
CustomModelessDialogBox dlg =
new CustomModelessDialogBox();
dlg.InitializeComponent();
// Note that a
window opened with Show() does not automatically have a relationship
// with the window that opened it.
This relationship can be established with the Owner
// property
dlg.Owner = this;
// Hook to an
event that will let this window know when the modeless dialog
// box has closed
dlg.ModelssClosed += new
delModelessClosed(dlg_ModelssClosed);
// A Modeless
dialog box is opened using the Show method which returns immediately.
// The calling window (this window)
therefore, cannot tell when the modeless window
// has closed. Instead, the modeless
window need to notify the parent window that it
// has closed. This is usually done
with events or even delegates.
dlg.Show();
}
void dlg_ModelssClosed(object sender, EventArgs args)
{
// Get the
sender
CustomModelessDialogBox dlg =
(CustomModelessDialogBox)sender;
// Get data
from sender
string strName = dlg.SomeName;
Trace.WriteLine("Name recieved from
Modless dialog box: " + strName);
// Process data
retrieved from dialog box
// ...
}
}
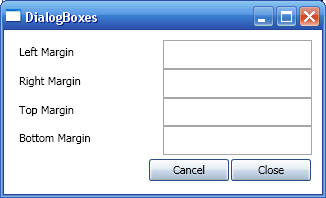
The following code is for a custom modal dialog box:
<!-- This window illustrates how to
implement a custom dialog box and how to return results to the parent -->
<Window x:Class="DialogBoxes.CustomModalDialogBox"
xmlns="http://schemas.microsoft.com/winfx/2006/xaml/presentation"
xmlns:x="http://schemas.microsoft.com/winfx/2006/xaml"
Title="DialogBoxes" Height="198"
Width="326">
<Grid>
<Grid Margin="10,10,10,10" MinHeight="50"
MinWidth="50" Name="grid1" >
<Grid.RowDefinitions>
<RowDefinition
Height="0.20*" />
<RowDefinition
Height="0.20*" />
<RowDefinition
Height="0.20*" />
<RowDefinition
Height="0.20*" />
<RowDefinition
Height="0.20*" />
</Grid.RowDefinitions>
<Grid.ColumnDefinitions>
<ColumnDefinition Width="0.5*" />
<ColumnDefinition
Width="0.5*" />
</Grid.ColumnDefinitions>
<!-- Left
Margin -->
<Label Grid.Column="0"
Grid.Row="0 " Name="lblLeft">Left Margin</Label>
<TextBox Name="txtLeftMargin"
Grid.Column="1" Grid.Row="0"></TextBox>
<!-- Right
Margin -->
<Label Grid.Column="0"
Grid.Row="1 " Name="lblRight">Right Margin</Label>
<TextBox Name="txtRightMargin"
Grid.Column="1" Grid.Row="1"></TextBox>
<!-- Top Margin
-->
<Label Grid.Column="0"
Grid.Row="2 " Name="lblTop">Top Margin</Label>
<TextBox Name="txtTopMargin"
Grid.Column="1" Grid.Row="2"></TextBox>
<!-- Bottom
Margin. This margin contains additional code to show how
to use a ValidationRule (see
comments in ValidationRule.cs -->
<Label Grid.Column="0" Grid.Row="3 "
Name="lblBottom">Bottom Margin</Label>
<TextBox Name="txtButtomMargin"
Grid.Column="1" Grid.Row="3"/>
<!-- Buttons
-->
<StackPanel Grid.Column="0"
Grid.ColumnSpan="2" Grid.Row="4" Orientation="Horizontal" FlowDirection="RightToLeft">
<Button
Name="btnClose" Click="Close_Handler" Margin="1,1,1,1" Width="80"
Height="22">Close</Button>
<Button
Name="btnCancel" Click="Cancel_Handler" Margin="1,1,1,1" Width="80"
Height="22">Cancel</Button>
</StackPanel>
</Grid>
</Window>
public partial class CustomModalDialogBox :
System.Windows.Window
{
public CustomModalDialogBox()
{
InitializeComponent();
}
private void Cancel_Handler(object sender, RoutedEventArgs
args)
{
// Set result
of user choice (this info is used by the parent of this dialog
// to determine user action). Note
that setting the DialogResult property also
// causes the window to close
automatically. Therefore, no need to call Close()
// if DialogResult property was set.
// Also note that if the <Button>
associated with this handler had the IsCancel
// property set to true, then we do
not need to set DialogResult to true
this.DialogResult = false;
}
private void Close_Handler(object sender, RoutedEventArgs
args)
{
// Validate
data using a validation rule (see comments in ValidationRule file)
// Set result of user choice (this
info is used by the parent of this dialog
// to determine user action). Note
that setting the DialogResult property also
// causes the window to close
automatically. Therefore, no need to call Close()
// if DialogResult property was set.
// Also note that if the <Button>
associated with this handler had the IsDefault
// property set to true, then we do
not need to set DialogResult to true
this.DialogResult = true;
// No need to
close this window as DialogResult property was set
// this.Close();
}
}
The following code is for a custom modeless dialog box:
<Window x:Class="DialogBoxes.CustomModelessDialogBox"
xmlns="http://schemas.microsoft.com/winfx/2006/xaml/presentation"
xmlns:x="http://schemas.microsoft.com/winfx/2006/xaml"
Title="DialogBoxes" Height="300"
Width="300">
<Grid Margin="10,10,10,10" MinHeight="50"
MinWidth="50" Name="grid1" >
<Grid.RowDefinitions>
<RowDefinition Height="0.20*" />
<RowDefinition Height="0.20*" />
<RowDefinition Height="0.20*" />
<RowDefinition Height="0.20*" />
<RowDefinition Height="0.20*" />
</Grid.RowDefinitions>
<Grid.ColumnDefinitions>
<ColumnDefinition Width="0.5*" />
<ColumnDefinition Width="0.5*" />
</Grid.ColumnDefinitions>
<!-- Left
Margin -->
<Label Grid.Column="0"
Grid.Row="0 " Name="lblLeft">Left Margin</Label>
<TextBox Name="txtLeftMargin"
Grid.Column="1" Grid.Row="0"></TextBox>
<!-- Right
Margin -->
<Label Grid.Column="0"
Grid.Row="1 " Name="lblRight">Right Margin</Label>
<TextBox Name="txtRightMargin"
Grid.Column="1" Grid.Row="1"></TextBox>
<!-- Top Margin
-->
<Label Grid.Column="0"
Grid.Row="2 " Name="lblTop">Top Margin</Label>
<TextBox Name="txtTopMargin"
Grid.Column="1" Grid.Row="2"></TextBox>
<!-- Bottom
Margin. This margin contains additional code to show how
to use a ValidationRule (see
comments in ValidationRule.cs -->
<Label Grid.Column="0" Grid.Row="3 "
Name="lblBottom">Bottom Margin</Label>
<TextBox Name="txtButtomMargin"
Grid.Column="1" Grid.Row="3"/>
<!-- Buttons
-->
<StackPanel Grid.Column="0"
Grid.ColumnSpan="2" Grid.Row="4" Orientation="Horizontal" FlowDirection="RightToLeft">
<Button
Name="btnClose" Click="Close_Handler" Margin="1,1,1,1" Width="80"
Height="22">Close</Button>
<Button
Name="btnCancel" Click="Cancel_Handler" Margin="1,1,1,1" Width="80"
Height="22">Cancel</Button>
</StackPanel>
</Grid>
</Window>
internal delegate void delModelessClosed(object sender,
EventArgs args);
public partial class CustomModelessDialogBox : System.Windows.Window
{
internal event delModelessClosed ModelssClosed;
private string _strName;
public CustomModelessDialogBox()
{
InitializeComponent();
}
private void Close_Handler(object sender, RoutedEventArgs
args)
{
// Set some
test data that will be retrieved by the window that
//launced this window
_strName = "WPF - DialogBoxes
tutorial";
// Tell owner
that this is modeless dialog box is closing
ModelssClosed(this, null);
// Unlike the
modal dialog box where setting DialogResult implicitly closes
// the dialog box, Modeless dialog
boxes must be programmatically closes with Close
Close();
}
private void Cancel_Handler(object sender, RoutedEventArgs
args)
{
// No need to
tell owner that this is modeless dialog box is closing
// as the user has cancelled
// ModelssClosed(this, null);
// Unlike the modal dialog box where
setting DialogResult implicitly closes
// the dialog box, Modeless dialog
boxes must be programmatically closes with Close
Close();
}
// This property will be called by the parent, when it (the
parent) handles
// the ModelessClosed event
public string SomeName
{
get { return _strName; }
}
}
Output screens are shown below: